1) Registration of Client order
- New client order
- Multiple loading or delivery addresses - Multibooking
- Additional Services to main order
- Delivery via TERMINAL
- How to delete a Client order?
- Exchanging the cargo information in OZOLS TMS
New client order
A quick way to open new Client order is by pressing the Function key F6 on keyboard
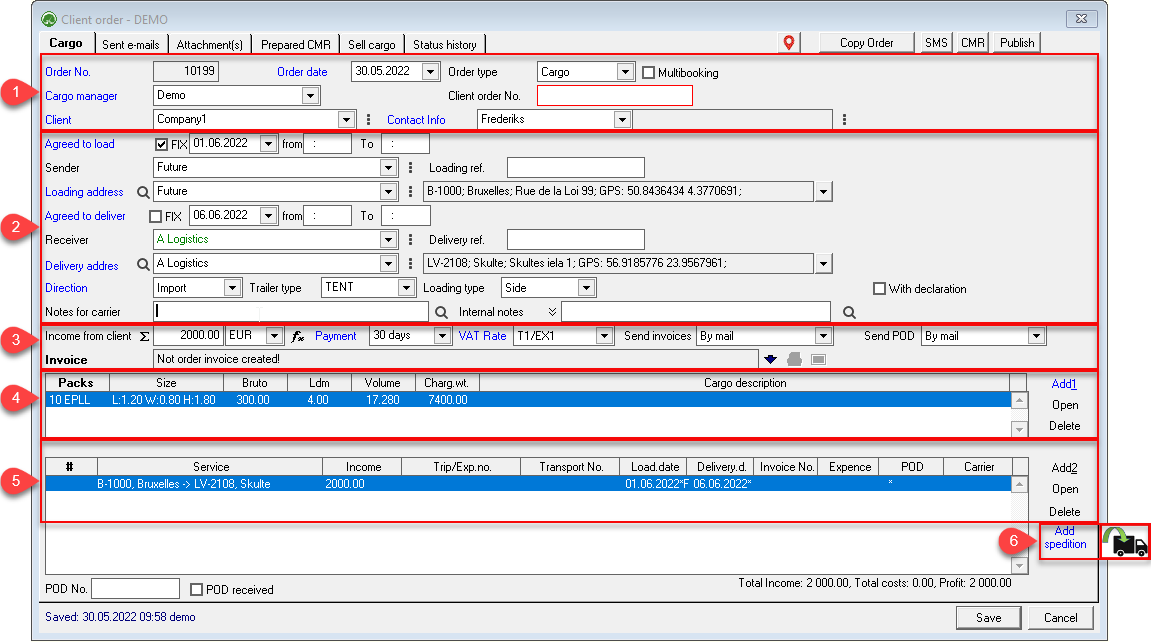
The client order page "Cargo" is divided into 6 information zones
- Basic Order information
1.1. Client and Cargo manager
1.2. Multiple loading or delivery addresses - Multibooking - Entering Loading and Delivery Addresses and Information
2.1. Searching the loading or delivery address - Income from the client
- Cargo description
- Description of services related to the cargo
- Adding cargo to a new or existing Trip / Expedition
1. Basic order information - main principles:
- A new Client order opens: OZOLS > Menu> Window> New Client order (or key F6).
- Enter the required information in the fields. Fields with Blue descriptions are required.
- Double-clicking on empty fields opens the information entry window or press the command button
 next to the field.
1.1. Client and Cargo Manager
Cargo Manager: The person responsible for this order.
Client: The Client (or partner) who orders the delivery of the cargo.
1. To add or find a Client, click the command button  next to the field.
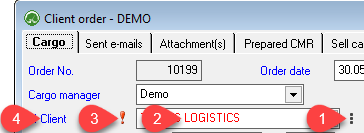
2. When one of the existing Clients is selected, the color of the name changes depending on the client's status (according to the traffic light principle - green, yellow, red).
3. ! The exclamation mark appears if there are remarks on the Client's card.
4. The " Client " field changes color, like a traffic light, depending on the payment status of the invoices of a particular client
The function key F3 opens the Client / Partner information card , with information about cooperation with this partner
Client order number. If you have received an order from a partner who uses OZOLS TMS, after entering the partner's company name and order number, you will have option to import the information for this order.
Contact info: The client's contact person who places the cargo order. If this data is entered correctly, it will be convenient both to re-add it to orders and, for example, to send e-mails (cargo status, invoice, payment reminder).
1.2. Multiple loading or delivery addresses - Multibooking
Multibooking is used when there are several loading or delivery addresses in one client order.
2. Loading and Delivery Address and information
Agreed to load or deliver: Enter the date and time when the load is to be loaded or delivered:
- FIX mark if the exact time is specified.
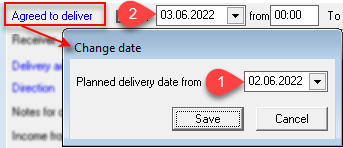
- If you need to specify the time interval from which the cargo must be loaded or delivered, click on the text "Agreed to load" or "Agreed to deliver". A window will open in which you can enter the scheduled date from (1) and enter the date until (2) in the date field.
Sender and Receiver:
- To add or find pres command button next to the field.
- A double-click in an empty field opens a new client (partner) input window.
Loading address: Enter a new address or choose from database.
2.1. Searching the loading or delivery address 


The Address Search window is used to quickly find and add a new or update an existing address in the database.
1. Address search field :
- In this field you can freely enter or paste the information you have.
- In this window entered information can be sorted and edited.
2. Addresses found :
- The program searches for the Company address in the internal database and Google maps.
3. Selected address :
- If one of the Found addresses is selected, the fields in this section will be filled in automatically.
- If the program does not find the desired address, enter it manually.
- If you enter a new Company and Address, it will be saved and you will not need to enter it again next time.
- Double click on Company name will open "Partner card"
- In the "Latitude" and "Longitude" fields, the program automatically imports GPS coordinates from Google maps. - You can check the address in Google maps by pressing 

The address must be entered accurately and in the corresponding fields!

Direction, Trailer Type, Loading Type - This information will be important when planning Trip / Expedition.
Notes for carrier: Additional cargo-related information:
- These notes are defined as templates for quick use.
- Press  to create a new template.
Internal Notes: Cargo-related notes that are not disclosed outside your company:
- These notes are defined as templates for quick use.
- Press to create a new template.
3. Income from the client:

- Enter the total amount of revenue without VAT and the currency to be paid to the customer.
- If changes occur during the processing of the order, e.g. an additional customs declaration is purchased, the value of the "Revenue from customer" field must be manually updated.
- If a Credit Invoice has been issued to the customer, the amount of the 'Revenue from customer' must be manually reduced by the amount of the Credit Invoice.
Aggregation 
- If pressed, the field " Revenue from the client" will be filled in automatically by summing the amount entered in the services.
- If this feature is enabled, it is not possible to manually change the value of the 'Client Revenue ' field.
Payment: Outgoing invoice payment term in days.
- The customer's default payment term can be defined: Partner / Customer> Other data page> Payment term
VAT rate:
- Selecting the VAT rate and then pointing with mouse on the field shows the VAT rate Article.
- VAT rates can be changed in the list: General lists> Tax list
4. Cargo description
A single customer order may include several different items. In this case, the items are entered on separate lines. As a result, the number of different items in the order is the number of lines in the Shipment Description.

To add a cargo description click Add1
Double-click to open an existing load description.
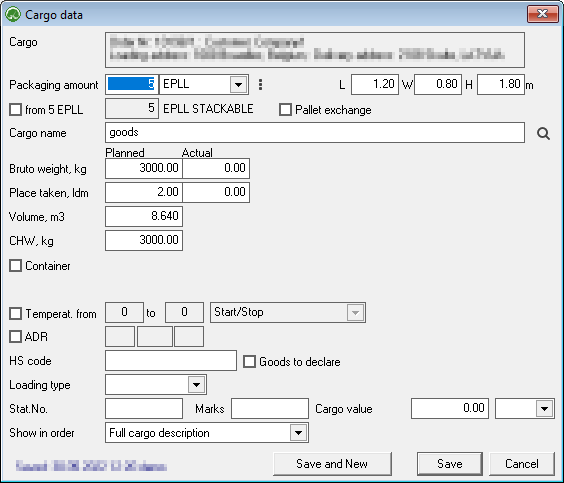
The list of packaging types can be changed (EPLL, BOX, etc.) according to the needs of the order by clicking and selecting Add new defined packaging type and its dimensions.
Package size: The dimensions of the package must be given in meters. For defined packages such as EPLL, the default dimensions can be entered in the description of the package type, then when the package type is selected the package size fields will automatically fill in.
Stackable: If pallets can be stacked on top of each other, mark how many pallets can be stacked on top of each other. This information will also be reflected in the order to the carrier. It will also be taken into account when automatically calculating the load space ldm.
Cargo name: Contents of packaging. These titles are predefined by pressing
Bruto weight, kg : If available, specify the bruto weight of the cargo in kg.
Place taken, ldm: For standard packages, the default ldm value can be specified in the Package size classifier. In this case, the field will be filled in automatically when selecting the quantity and type of packages. Also, the program will take into account the value of the Stackable packages and will reduce the ldm value.
Volume, m3 : When entering the package dimensions, the volume field is calculated automatically.
CHW, kg: Chargeable Weight is used to calculate your income and expenses. The software automatically calculates and selects the larger weight by comparing the gross weight and the volumetric weight. The gross weight of a load is the actual weight, while the volumetric weight is the dimensional weight, where 1ldm = 1850kg and 1m3 = 300kg).
Stat.No .: "Statistical number" is displayed in CMR column 10 if you are printing from a OZOLS TMS.
Temperature from… to: Temperature range required by the client during delivery.
ADR : check if a dangerous goods permit is required.
Save and New: You can save time and choose this command button if you need to enter several cargo items in one order.
Depending on the configuration, if there are several loads in one car/trip, but there are total expenses for the whole trip, the expenses will be divided among the customer's orders in proportion to the entered Chargeable Weight!
5. Description of services
This section of the order automatically generates the main service description from the information entered above.

The main service number is "0" and this number is not displayed. All additional services are numbered. For example:
- Delivery from loading address to terminal (pick up) # -1
- Main Trip / Spedition # 0
- Delivery from terminal to unloading address (domestic) # 1
- Additional services (eg customs) # 10
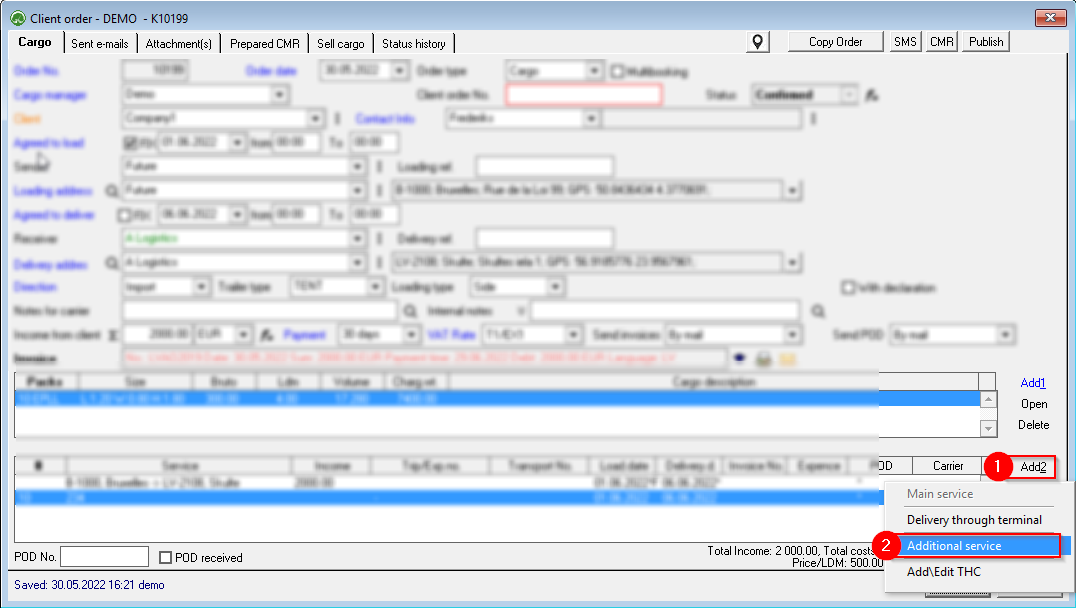
Additional services: If additional services are provided as part of the client's order, e.g. Terminal Delivery, Cargo Insurance, Handling Services, Export Declaration, Customs Services, Downtime, Warehousing, etc.
Additional services are added by clicking the Add2 command button
Travel / Expedition. no: for more information read: Selecting the trip / forwarding number.
Order in the trip: this will be the order if there are several services to be provided in one trip/spedition/order.
Service: You must select a service from the classifier that will appear on the invoice. For more information on selecting a value, see Working with drop-down lists. When adding a new service, it must be translated into the languages in which the invoice is issued, see the section on translation:
Service Notes: Additional text to be included in the outgoing invoice
Service period from… to: The service period is displayed on the invoice printout
Include the service in the outgoing invoice: If you want the provided service to be included in the customer's invoice, then you must fill in the fields for the outgoing invoice
Apply the revenue and expenses of the service to the main freight forwarding: By default, the revenue and expenses specified in the service are attributed to the Voyage Forwarding in which the service is placed. If the revenue and expenses need to be attributed to the main flight / forwarding of the Customer's order (marked with No. 0), then this “ckeckbox” must be ticked
Incoming Invoice: You must fill in the planned spend fields.
6. Once the order has been entered, it must be added to the Trip / Expedition that will deliver it!

Multiple loading or delivery addresses - Multibooking
Multibooking is used when there are several loading or delivery addresses in one client order.
- Check Multibooking
 ;
; - Click
 to add additional loading addresses ;
 - Click to add additional unloading addresses ;
- The order number is assigned a sub-number. You can switch between multibooking orders by pressing
 .
.


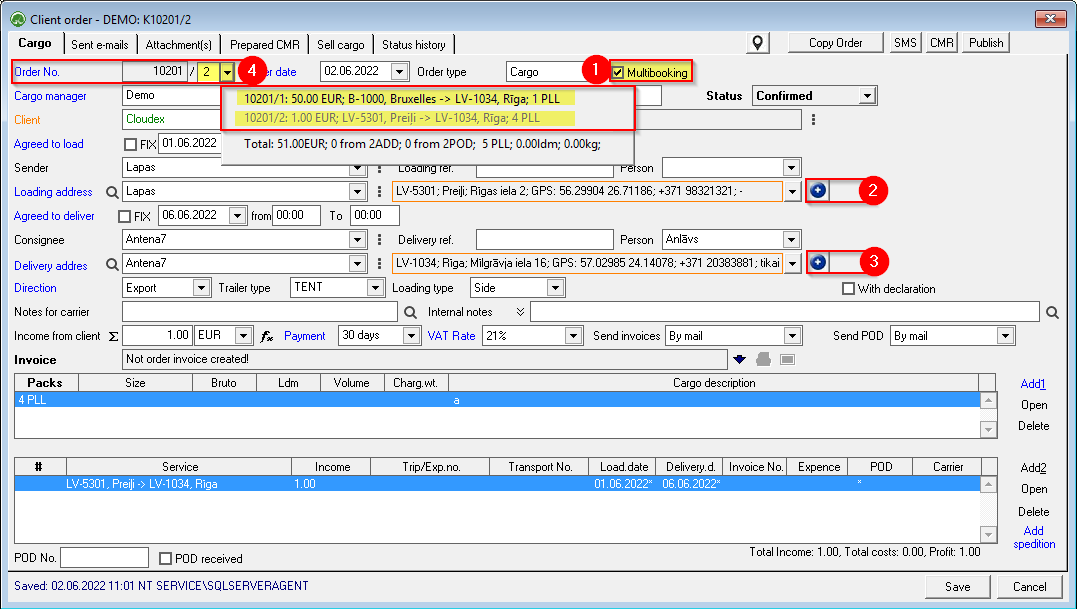
The following must be done for each Multibooking cargo separately:
1. Description of the Cargo
2. Added to existing or new Trip/Spedition
3. If Multibooking order is fulfilled by several carriers, the income from the customer must be specified for each shipment.
4. Once the Multibooking order has been entered, every part of it must be added to the Trip / Expedition that will deliver it!

Additional Services to main order
Additional Services - services provided as part of the main client order, for example:
- Cargo insurance ,
- Transshipment services,
- Export declaration ,
- Customs services,
- Downtime ,
- Storage in warehouse , etc.
Additional services are added in the lower part of the Client's order window on the right side by pressing the command button Add2 and choose Additional service
In addition, there are 2 information areas in the service window:
1) Information for the Service recipient ;
2) Information to the service provider, such as the carrier.
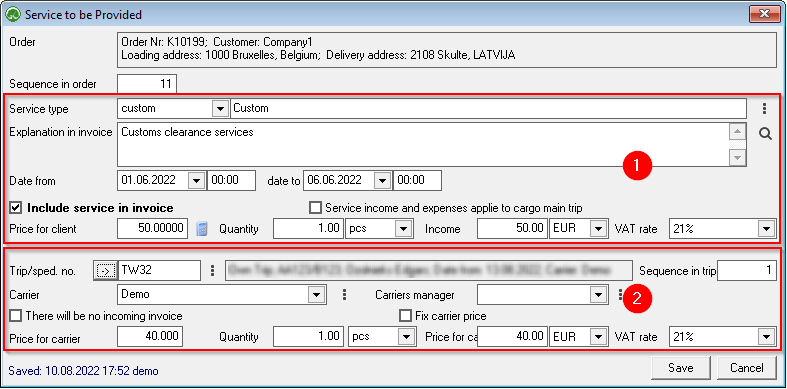
Customer Order: Summary of customer order information.
Sequence in order: Additional service sequence number from 10 upwards. Learn more here .
1) Information for the recipient of the service
Type of service: You must select a service from the classifier, which will be visible on the invoice. When adding a new service, it must be translated into the languages in which the invoice is issued, for translation see the point: Translation of records.
Explanation of the service in the invoice: Additional text that must be included in the outgoing invoice
Service period from ... to ... : filled in if the Service is displayed in the invoice printout
Include the service in the outgoing invoice: mark if the service should be included in the customer's invoice.
Allocate service revenues and expenses to the main shipment of the cargo: Check here, if the service will be applied to the main voyage/expedition of the Customer's order. After the default, the service's revenues and expenses are attributed to the separately created Trip / Expedition.
Price to the customer; The amount; Revenue; VAT rate: filled in according to the amount of additional service
2) Information for the service provider
Trip/ spedition no.: Voyage/ Expedition number to which the service is applicable. If not known, do not fill in.
Sequence in Trip: The sequence of service on the Trip.
Carrier: If unknown, do not fill in.
Carrier manager: If not known, do not fill in.
There will be no incoming bill: if there will be no bill for the additional service.
Record expenses/carrier price: if checked, the carrier who also works in the OZOLS TMS system, when entering the order reference , will see the agreed price.
Price to the carrier: The price for which the Carrier has agreed to deliver the cargo.
Quantity: The amount of additional service.
Costs and VAT rate: Additional service costs.
Delivery via TERMINAL
1) How to create Terminal
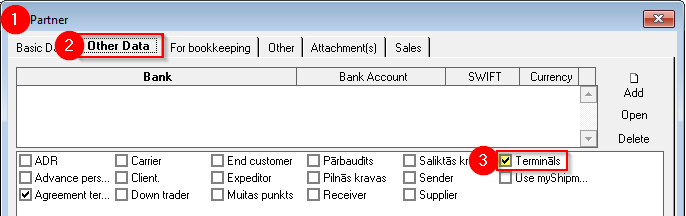
The Cooperation Partner who provides terminal/warehouse services must have the "Terminal" mark in the Partner's card.
OZOLS > Contacts > Lists > All partners > Partner card
- In the partner card
- Open Other data
- Mark the group "Terminal"

2) Delivery via terminal
1. Open the Client's order, which must be sent through the terminal
2. In the list of services, select the command button Add2 ( 1) > Delivery through the terminal (2)

The numbers of the Services included in the order
1) The number of the main Trip/spedition, is " 0 " and is not shown (Its field is empty) ;
2) Additional transportation before the main trip is with minus sign;
- Delivery from the loading address to the terminal (pick up) # -1; #-2
3) Additional shipments after the main trip are positive numbers
- Delivery from the terminal to the delivery address (domestic) # 1; # 2
4) Additional services , such as customs, insurance, etc. are numbered from ten # 10; #11...
3. Choose at which part of delivery the terminal will be used:
A. Delivery from the loading address to the terminal (1)
B. Delivery from the terminal to the delivery address (2)
4. For the terminal:
- Terminal: Name and address;
- Planned delivery to the terminal: Date, time;
- Revenue : the amount that is diverted from the main trip revenue to this local trip.
- Local delivery expenses: If the expenses are not yet known, then this amount can be entered later.
5. Trip/sped. no.: If possible, add the Cargo to a new or existing local Trip/Expedition.here .

How to simultaneously mark several loads for delivery through the terminal?
A. In the Trip/spedition window > Hold the Ctrl key with the mouse to mark the loads that will go through one terminal > Add > Delivery through the terminal
B. Expeditor's desktop (F8) > "General planning" page > Right mouse button on the selected load > Delivery through the terminal
How to delete a Client order?
Before deleting the Client order, make sure that it would not be more correct to change the order status to - Cancelled.
Read more about changing the order status here .
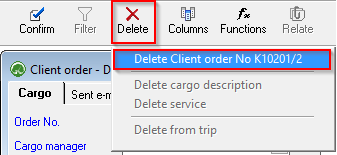
- Open the Client order you want to delete.
- Press Delete and select Delete Client Order No ...
If an invoice has already been created for the Client order, program will not allow the order to be deleted!
To delete the order with invoice:
- Open the prepared invoice,
- Cancel the confirmation of invoice
- Delete the Invoice.
- Now it is possible to delete a customer's order.
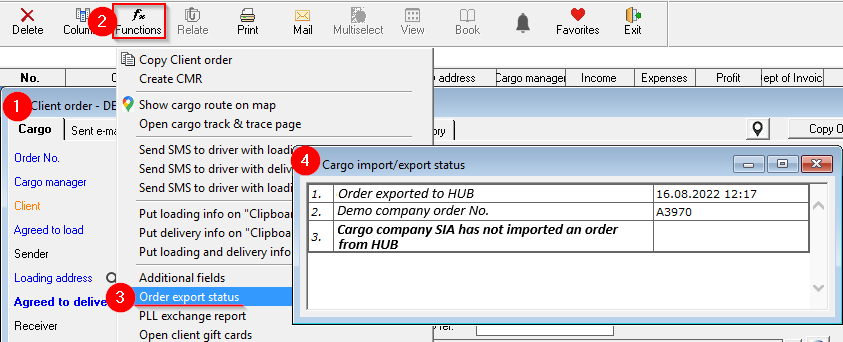
Exchanging the cargo information in OZOLS TMS
Companies that use OZOLS TMS can exchange order information automatically using reference number.
1) Sending cargo information to partner
- Press Mail or Print
- Choose – Order for carrier
- The system will prepare e-mail, with attached CARGO TRANSPORTATION ORDER – AGREEMENT

- The number of CARGO TRANSPORTATION ORDER – AGREEMENT is the cargo reference number

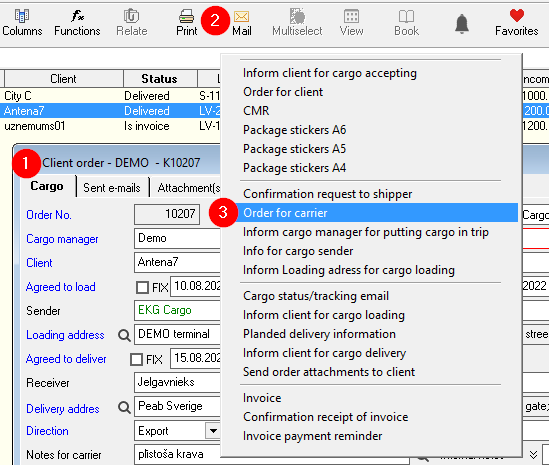

Number of this agreement is the reference number for the cargo information
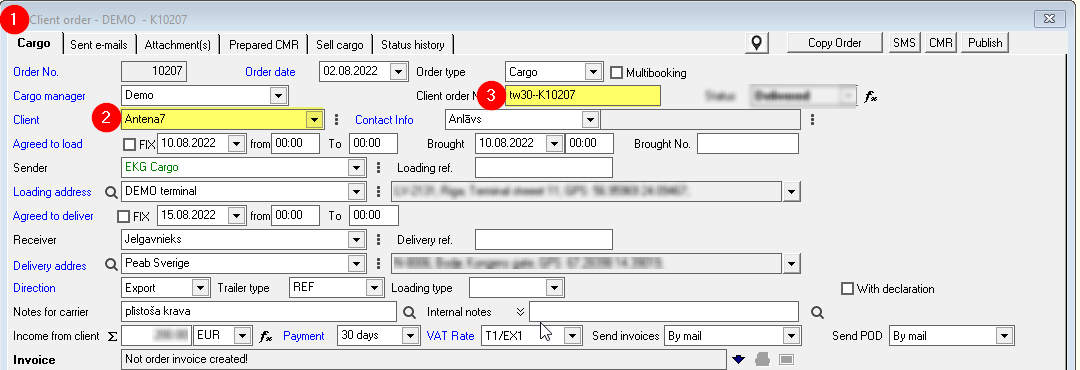
2) Receiving of cargo information from partner
- When creating new client order,
- Enter the name of the Client,
- Enter the number of Cargo Transport order - agreement = Client order No
- OZOLS TMS will offer you to fill the information from Partner automatically.

ATTENTION! Some OZOLS TMS user companies have disabled this option.
3) To check the status of Cargo information exchange: