Basic principles
- Main window layout and commands
- Open Windows
- Shortcuts to frequently used forms
- Filter
- Search window
- Recording and editing history
- Columns - adjusting the design and content
- Adjusting Column width
- Customize column content and order
- Defined columns
- Multiselect - highlight the desired rows
- Calculator - sums of highlighted rows
- Print or export selected data to Excel
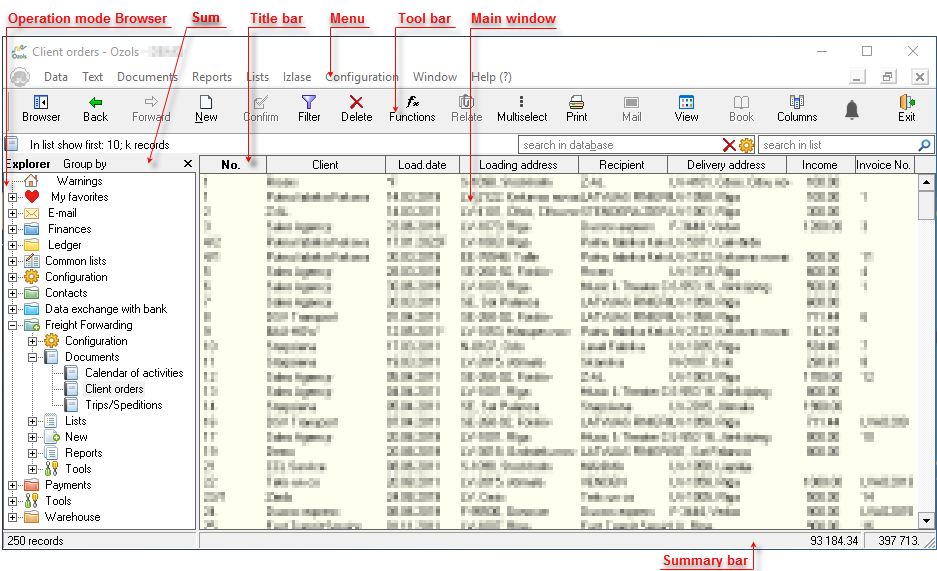
Main window layout and commands
Browser
The Operation Mode Browser is displayed on the left side of the screen and is used to display the available working modes. The layout of the working modes is similar to the main menu.
The operating modes are displayed hierarchically in the browser. To activate the required action, you must click on the entry to open the lowest level operating modes. For example, by clicking on the Customer Orders command, the Customer Orders overview opens on the right side in the Main Window. To open the next required operating mode, click on it in the browser and the specified operating mode will open in the Main Window.
You can hide or show the browser using toolbar commands  or the
  button.
Main menu
Activation of all program activities is available in the main menu. The main menu is available for the entire duration of the computer program. Using the main menu is similar to using Windows programs.
The operating modes in the program are grouped under the menus Data, Text, Documents, Reports, Lists, Favorites, Configuration, Window, Help. All these operating modes can also be found using the Browser.
The most commonly used main menu commands are also available from the toolbar of your computer program.
Toolbar
The toolbar is a graphical layout of command buttons that allows you to perform the required action faster and more clearly.

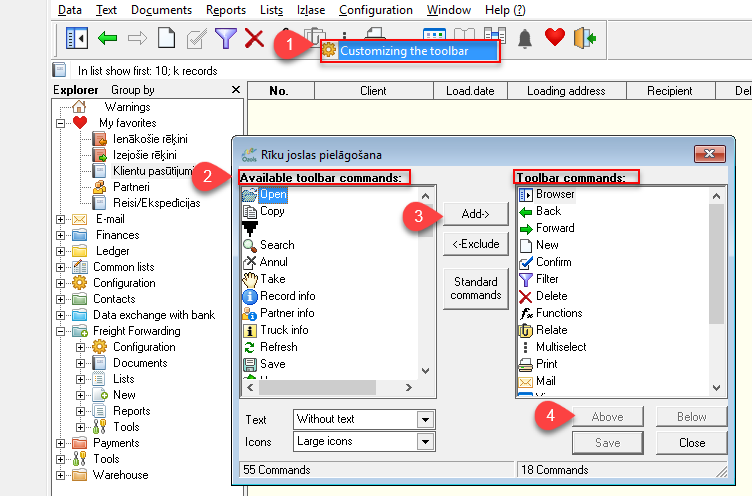
Customize Toolbar
The toolbar can be configured. Place the mouse over the Toolbar. Click on the right button and select Customize Toolbar.
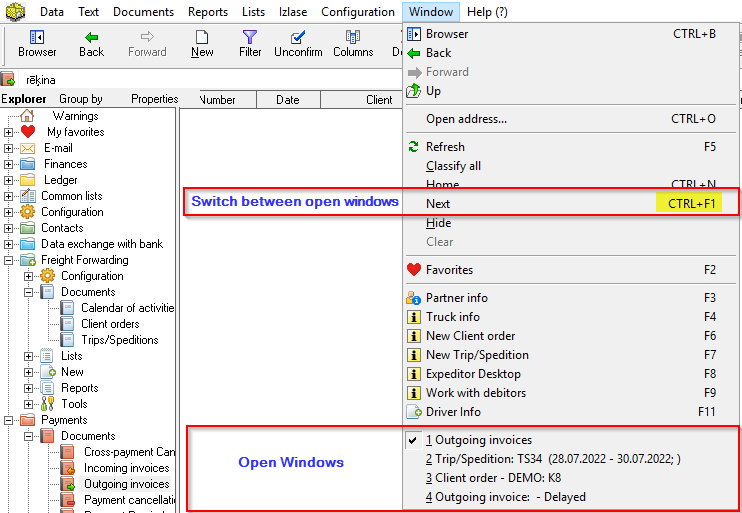
Open Windows
Sometimes one of the open windows disappears because it has fallen behind another window. To find it:
- To switch between open windows, press Ctrl+F1
- Or from the menu, press Window
- A list of open windows is shown at the bottom of this window. To open a window, click on it with the mouse. mouse.

Shortcuts to frequently used forms
1. Function keys
The function keys allow you to quickly open one of the OZOLS TMS sections

The most frequently used Function keys:
F6 - New Customer order
F7 - New Voyage/Expedition
F8 - Forwarder 's desktop
|
Function keys |
Explanation |
|
F2 |
|
|
F3 |
|
|
F4 |
|
|
F5 |
|
|
F6 |
|
|
F7 |
|
|
F8 |
|
|
F9 |
Work with debtors |
|
F11 |
|
|
F12 |
|


If the Function keys do not work , press Fn + Esc on the keyboard
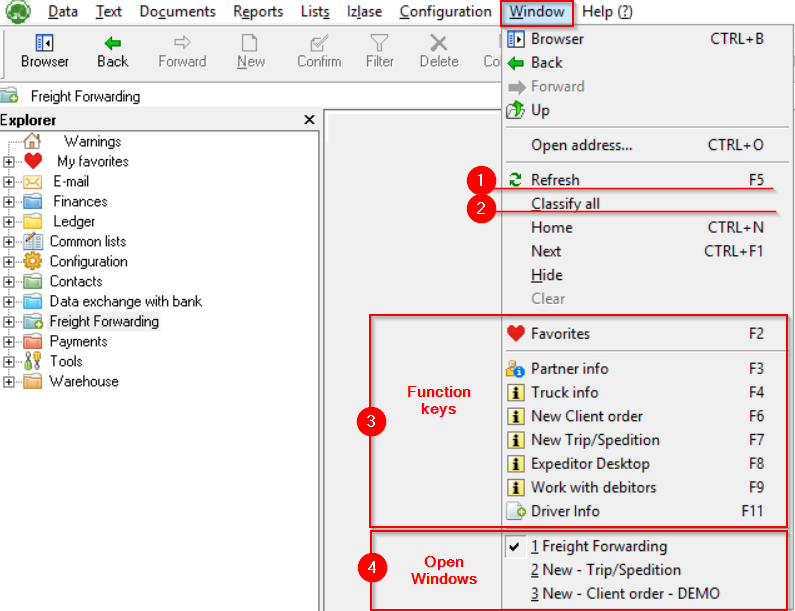
2. Opened windows and Function key summary
- Update data in the currently open window (F5)
- Arrange all creates a cascade of open windows. This allows you to quickly switch between open windows
- Shortcuts to function keys
- Opened windows - Helps to find collapsed windows
3. General key combinations in OZOLS TMS
| Key combinations | Explanation |
| Tab | Navigating from field to field |
| Shift+Tab | Navigating from field to field backwards |
| Ctrl+Tab | Switch between form pages |
| Alt+Arrow Down | Opens a drop-down list for selecting a record |
| Shift+Arrow Down | Opens a drop-down extended list for selecting a record |
| Shift+Arrow Up | Opens the selected drop-down record or, if no record is selected, creates a new record |
| Alt+ underlined letter | The mouse cursor moves to the label field containing the underlined letter |
| Escape | Cancels changes to the open form |
| Enter | Saves open form data |
| Ctrl+G | Book document |
| Ctrl+P | Prints the selected document |
Filter
Almost all sections of OZOLS have the possibility to set a Filter for selecting the data you need. The Filter is located in the toolbar.

If all records are not displayed when opening one of the OZOLZ TMS sections, make sure that one of the filters has not been turned on from the previous use.
- To find a document by number, it is enough to enter the last two digits of the number.
- % sign in front of the entry enables search for partial number or name.
- To select several order numbers , enter them in the "Search number(s)" field, separated by a comma.
- A checkmark
 turns on the specific filter

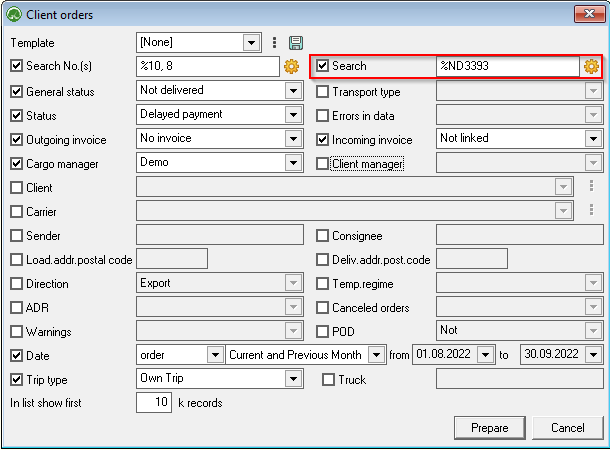
The additional Search function built into the filter on the right side of window allows you to enter additional search criteria. More about search options here.
Search window
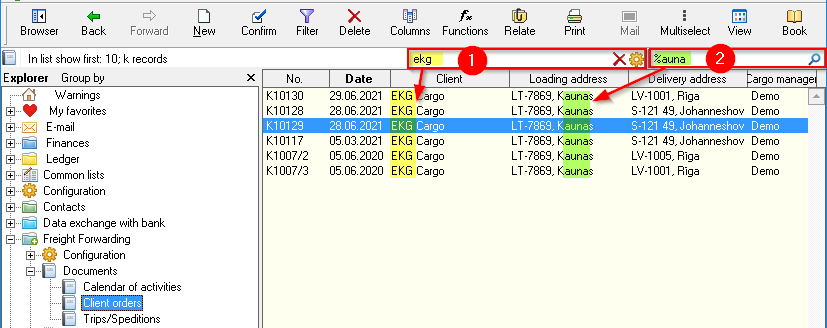
How the search window works:
- If you search for, for example, "ECG" the program will select all records where the field name starts with "ECG"
- If you search " % ECG" the program will select all records where the field record contains "ECG"
- If you search for “ ! "ECG" program will select all records where the field name does not start with "ECG"
- If there are spelling differences, the unknown letter is replaced by an underscore " _ ". For example, you can search for the word "Vilnius" as "Viln__s"
- Square brackets [ ] ar used to search for multiple possible letters . For example, searching for “ [ CS ] heryl” will find the result for both Cherlyl and Sheryl
Two search windows:
- The data is searched in the OZOLS database;
- Data is searched only in the open table.

Recording and editing history
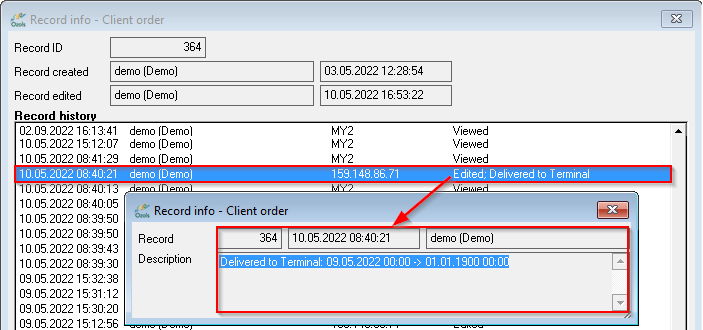
Almost all records or editing made in the OZOLS TMS are logged and their history can be viewed.
Record history information:
- when and who added the record ;
- when and who opened/viewed the record ;
- when and by whom the record has been edited and specifically what changes have been made.
To view Record history:
- Open the desired window and press the key combination Ctrl+i
- Record info displays which user created, edited or viewed the data
- If the text "Edited" is next to the record, then you can open additional information about the history of the record with a double click.
Columns - adjusting the design and content
Read about adjusting the design and content in the following sections:
- How to adjust column content and order?
- How to change column width?
- How to put a colleague's column layout in your Ozols?
- How to quickly change the appearance of columns? - Defined columns
Adjusting Column width
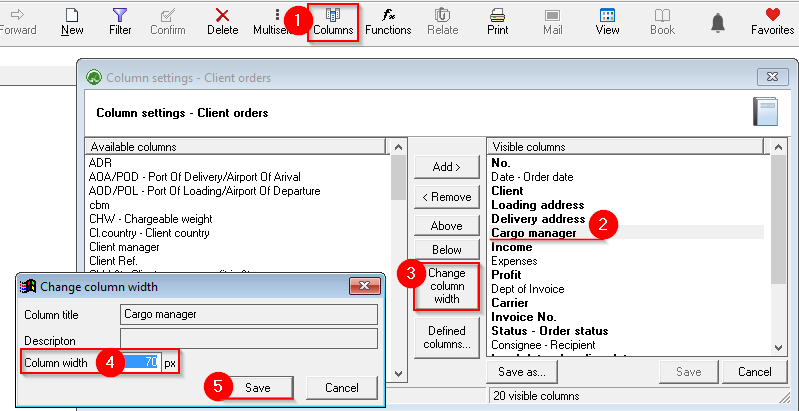
To change the column width:
Open the OZOLS TMS table where you want to change the width of the columns.
1. In the toolbar, select the Columns toolbar button  or press Ctrl+K. The Column settings window will open
2. In the Visible columns section , select which column width you want to change
3. Press the Change column width button
4. In the Column width field, write the desired column width in pixels
(informative: 1px ≈ 0.26mm; 100px ≈ 2.6cm)
See also:
1) Customize table column content and order
2) Defined columns
Customize column content and order
Open the table you want to make changes to
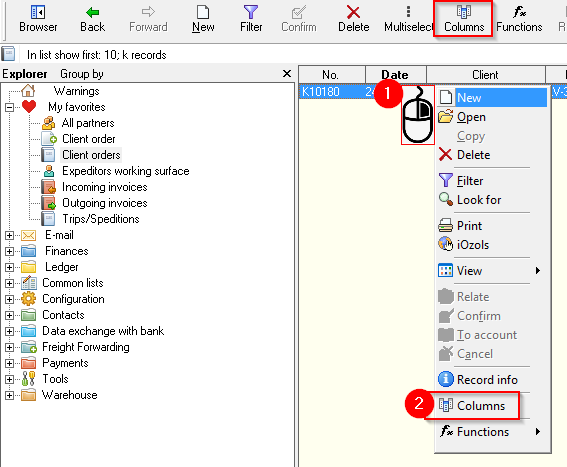
- Press the right mouse button on any of the rows in the table
- Or in the menu, press Columns (Ctrl+K)

- Columns are divided into Available columns (possibly included in the table) and
- Visible columns (already included in the table)
- Mark with the “mouse” the desired column on one or the other side and press the Add or Remove buttons as needed to adjust the table content
- Change the order of the columns with the Up or Down buttons . Moving Up moves the column to the left in the table. Moving Below moves the column to the right in the table.
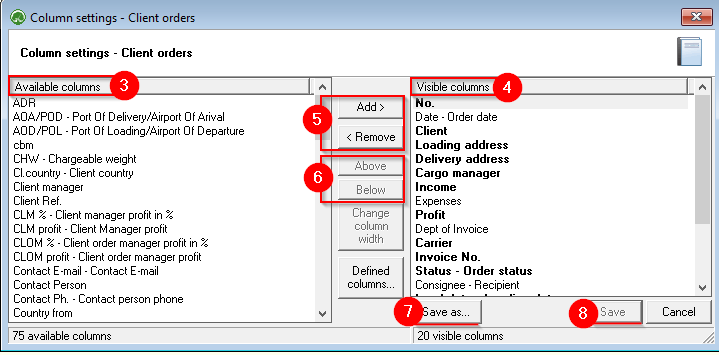
The Save As... button allows you to save the selected layout as defined. This means that both you and other users of your company's OZOLS database will be able to open this table layout.
See also:
1) Change column width
2) Defined columns
Defined columns
Defined columns allow you to save the table column layout you create with a name. Columns saved in this way are easily available both for their own needs and for installation by other users. So, for example, defined column selections can be created within the company, which can be easily installed by new employees.
First, open the table where you want to install the defined columns. Select the  Columns button on the toolbar ( Ctrl+K )
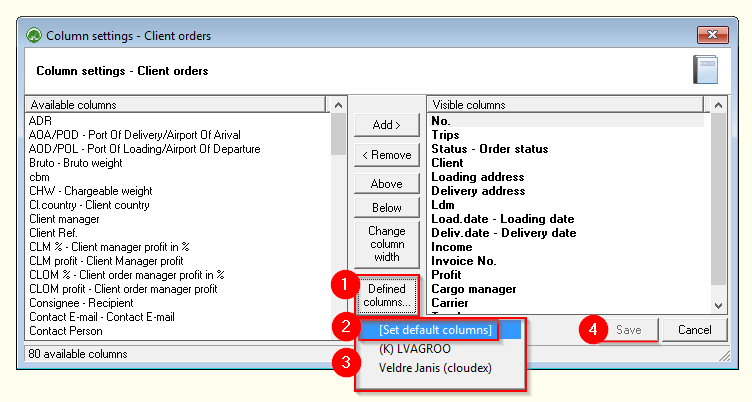
- Click the Defined Columns… button.
- Default columns - layout recommended by OZOLS TMS
- Columns defined in your company
- Click Save to activate the defined columns
To create a selection of Defined Columns
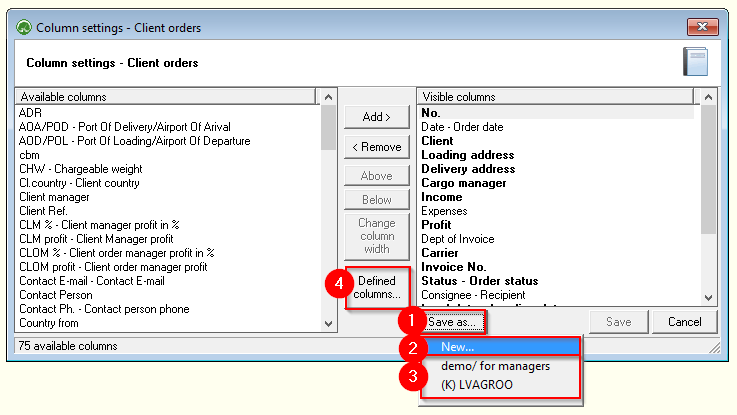
- Adjust the columns shown in the table as needed ( tutorial here ) and press the button Save as...
- To create a New selection of defined columns, press New...
- To edit or delete previously saved defined columns, select by name
- To open a selection of predefined columns, click the Defined Columns… button.

- Gives a name to a selection of defined columns
- Tick if you want the columns to be available to all users. If the "tick" is not placed, then only you will see this selection
- Press save. The Defined Columns you have created can be found by clicking the Defined Columns… button.
- If you need to delete one of the previously created selections of Defined columns, open it (5) and press the Delete button

The Defined Columns you created can be found by clicking the Defined Columns button
Multiselect - highlight the desired rows
Multiselect is used when it is necessary to select individual rows in random order. such as cargo and add to the trip.
1) In the toolbar, select Multi-select. ( Ctrl+Y)
2) Then, similarly to Excel, holding down the Ctrl or Shift keys with the "mouse" mark the desired rows
3) The marked rows depending on the open window:
- The marked loads on the freight forwarder's desktop can be added to the marked flight
- Calculator - the sums of the marked lines
- Print or export to Excel
- Depending on the window, additional options are available by pressing the Functions command button
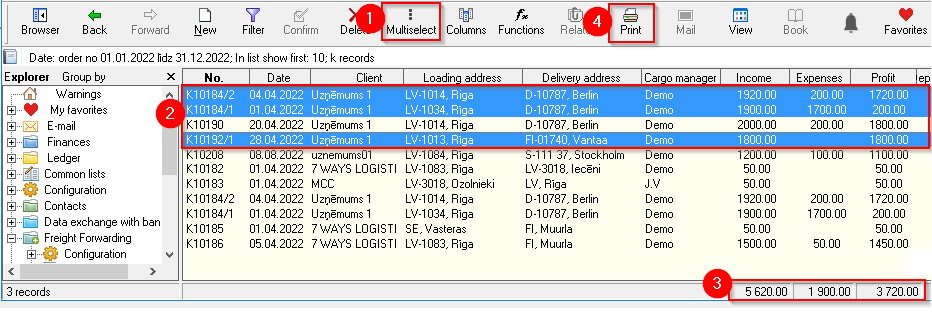
Calculator - sums of highlighted rows
OZOLS TMS allows you to select individual rows in the table in order to sum the numbers in these rows.
- In the toolbar, select Multi Select. (shortcut Ctrl+Y)
- Then, similar to Excel, holding the Ctrl or Shift keys with the "mouse" selects the desired rows
- The sums of the highlighted rows are shown in the lower part of the table

See also:
1) Option to print or export highlighted rows to Excel . Press Print ④ and follow the instructions.
2) Additional options, depending on the opened window, by pressing the Functions command button
Print or export selected data to Excel
Ozols TMS enables you to select the desired data in tables and print or save in Excel:
- Choose Filter
 (shortcut Ctrl+F ) from the toolbar and select the data you want to select.
 - On the toolbar, choose Columns (shortcut Ctrl+K ) and choose the columns you need. There is an option to save this column selection in the Defined Columns section.
- If you need to select only some rows, select Multi select
 from the toolbar. (shortcut Ctrl+Y)
 - Similar to Excel, holding the Ctrl or Shift keys with the mouse selects the desired rows
- Choose View
 from the toolbar (shortcut Ctrl+H ). At this point, a table with the selected data will be displayed in the main window.
 - Right- click anywhere in the newly created table and select print or export to Excel


To send the data to a printer or export to Excel , click View and follow the instructions.
See also:
1) Calculator - sums of highlighted rows
2) Column width