Instalation
- 1) Installing
- 2) Log in
- 3) Changing of password and user information
- 4) Signature with stamp on orders and invoices
- 5) E-mail settings
- 6) Incorrect letters in your local language?
- 7) Unable to connect to OZOLS TMS
- 8) E-mail server configuration for work with Ozols TMS
- If Windows Smart App Control blocking your app
1) Installing
These instructions apply for installing OZOLS TMS on Windows computers! To use OZOLS TMS on Mackintosh computers, please contact customer support at info@cloudex.lv
- Download the OZOLS TMS installation click here
- Open Downloads folder and Dbl-click on "ozols_client_setup.exe"
- Follow the instructions
- OZOLS TMS is ready to use
Proceed with Logging in to OZOLS TMS fallowing instructions - click here.
Unable to connect - click here
2) Log in
To log in to OZOLS TMS you need to enter in the registration window user data you received via e-mail
- User: OZOLS TMS username received via email
- Password: OZOLS TMS password received via email
- Server: online3.cloudex.lv
- Database: OZOLSABC
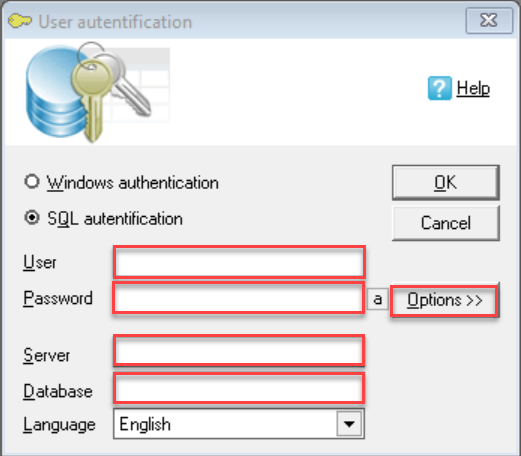
Unable to connect - click here
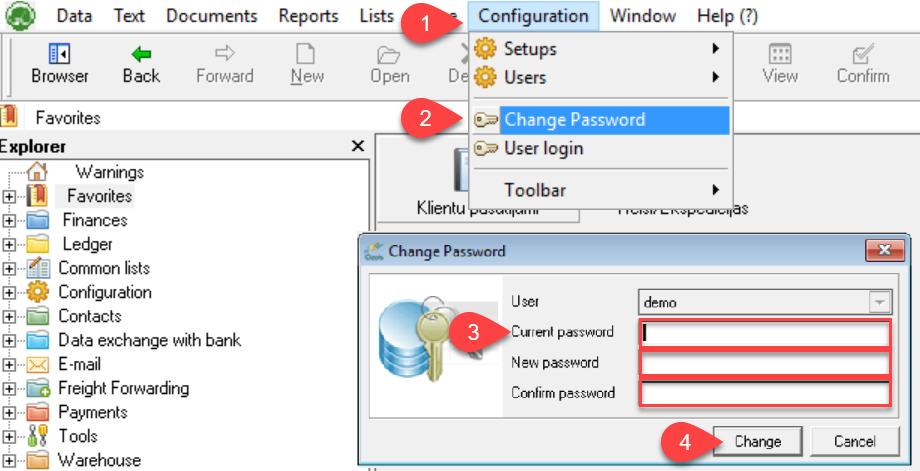
3) Changing of password and user information
When you start using OZOLS TMS, you receive a user password, which must be changed for security reasons. Follow these instructions to do it:
To change your password:
- In menu select Configuration
- Change password
- Enter requested information
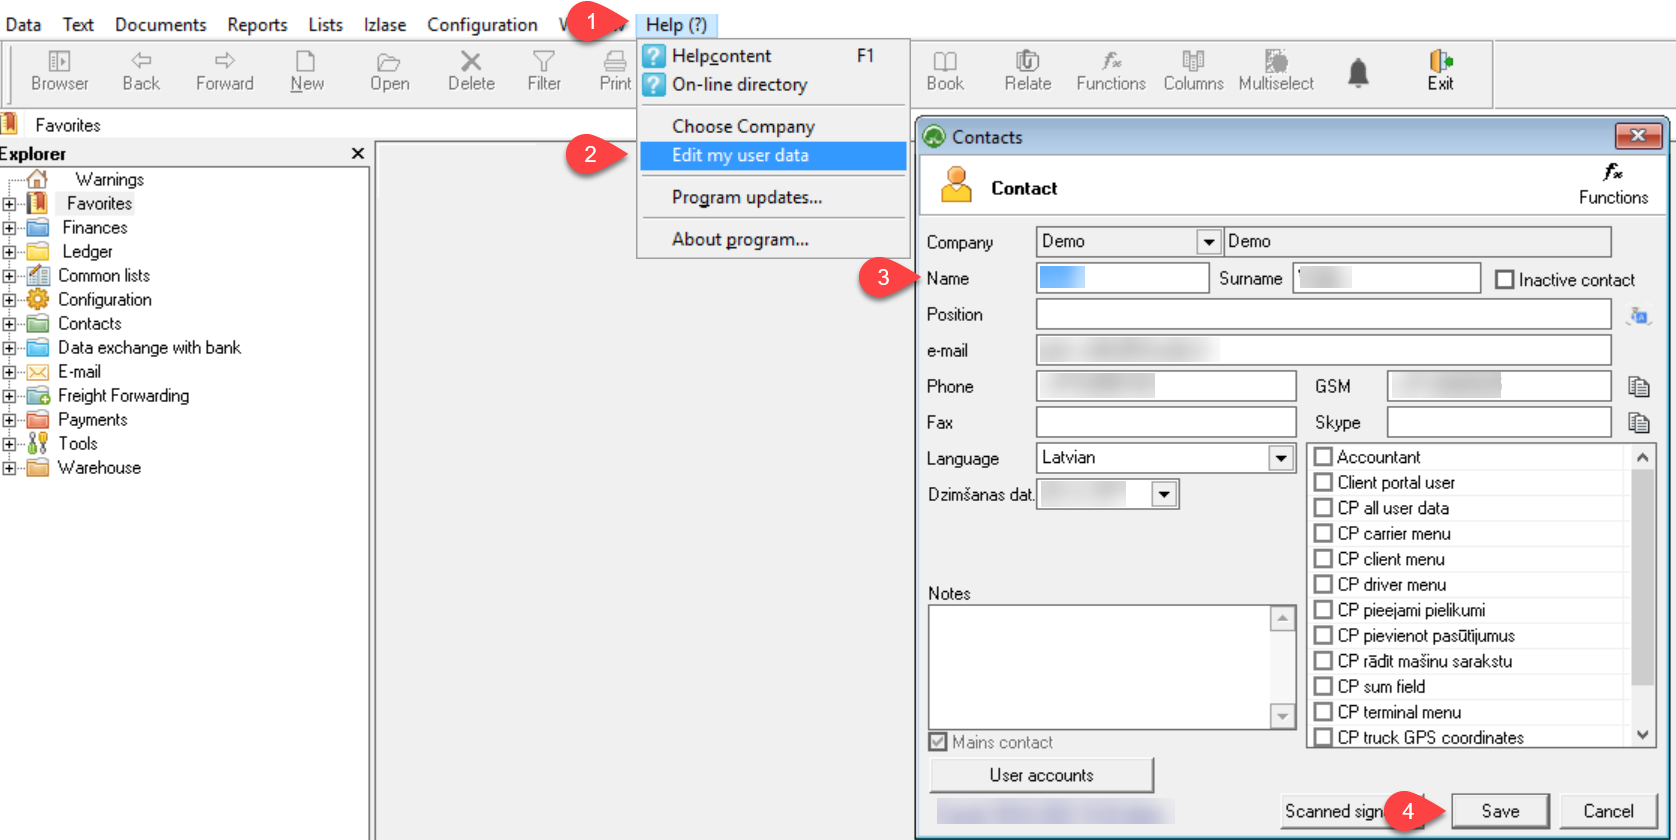
User data is important because it is included as your contact information in various documents generated by OZOLS TMS.
To add or change your user data:
If you have questions regarding these instructions, please contact the OZOLS TMS Customer Support team: info@cloudex.lv or call +371-(283) 8 83 00
4) Signature with stamp on orders and invoices
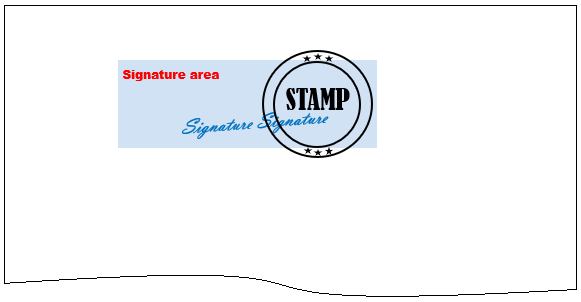
A scanned stamp with signature is most commonly used for Customer Orders, Transport Orders, Payment cancellation acts and Reconciliation acts
- Stamp and sign a white sheet of paper. The size of the signature must not exceed the bottom and top edges of the stamp. (see light blue field in sample image below).
- Scan the sheet of paper as a JPG image and save it in your compute

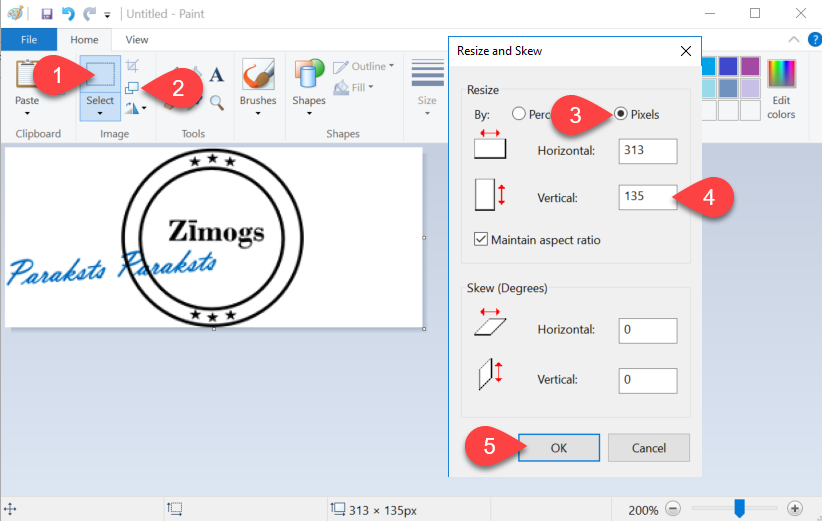
- Open the document in Paint (see image below ). Resize ① and make the image as vertically narrow as possible, including the signature and the stamp
- Using the Resize and Skew function ②, resize the image vertically to 135 Pixels ③ ④.
- Save the created image to your computer in PNG format.
Important! Further steps have to be done in OZOLS TMS!
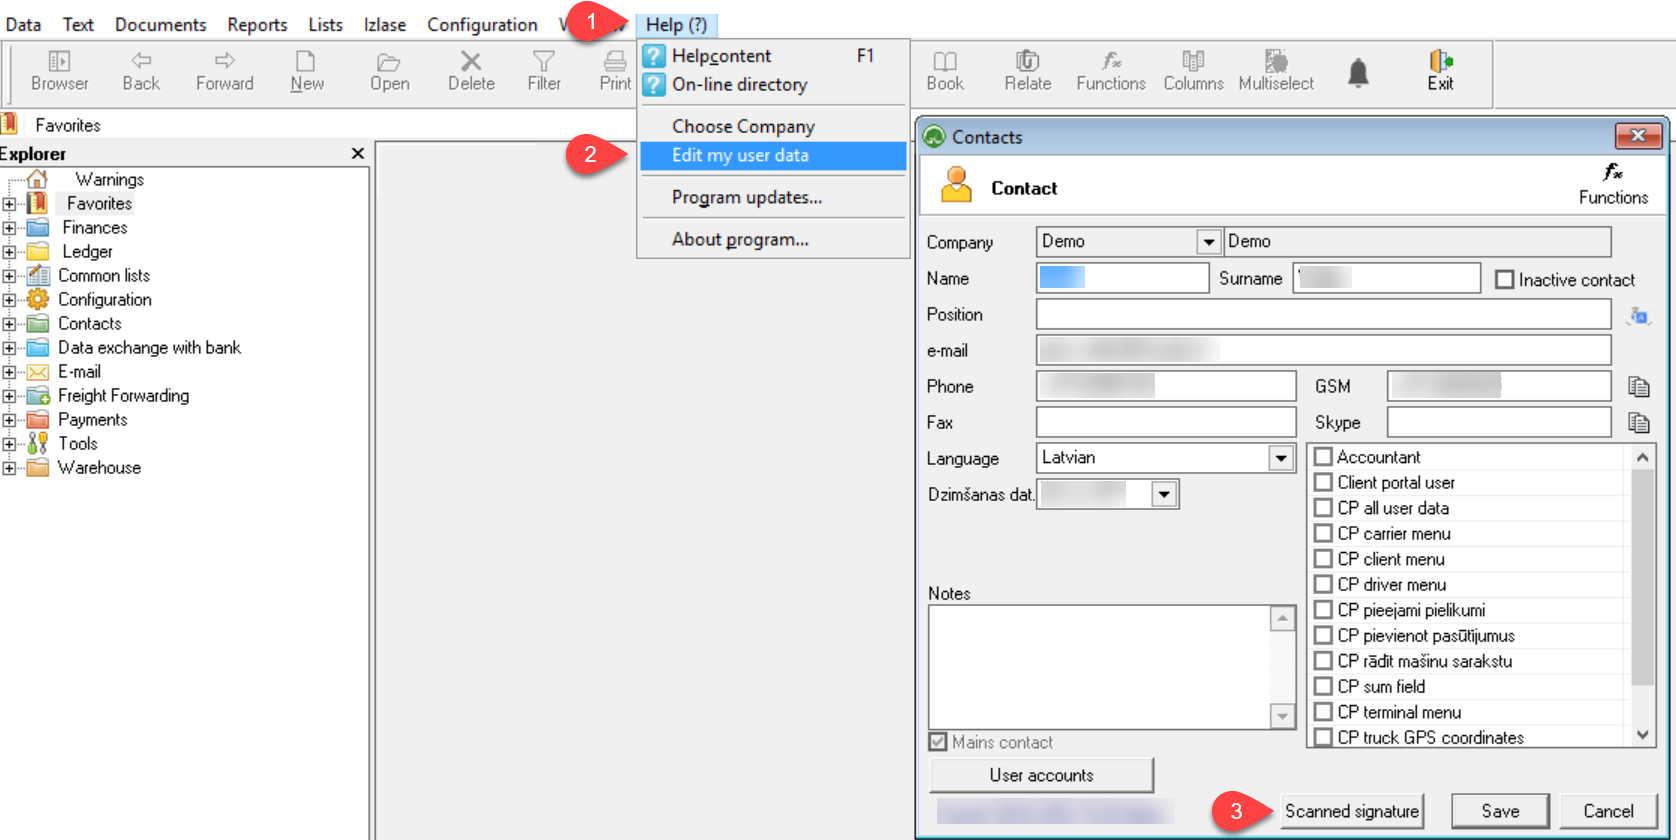
- Open OZOLS TMS and select Help
- Edit my user data
- Click the button - Scanned signature

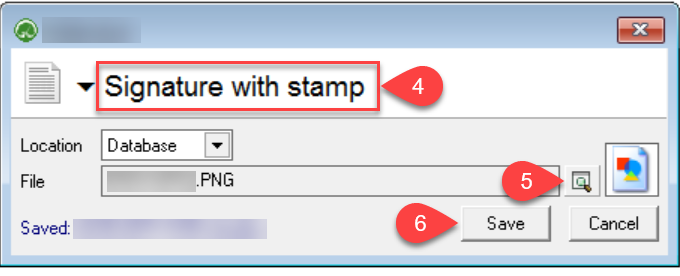
- Select Signature with stamp
- Click the search button and add previously scanned and prepared image (vertical size 135px).
- Save

If you have questions regarding these instructions, please contact the OZOLS TMS Customer Support team: info@cloudex.lv or call +371 (283) 8 83 00
5) E-mail settings
To send emails from OZOLS TMS, you need to enter your e-mail address and e-mail password in system.
If you enter the correct e-mail password but emails from OZOLS TMS are not sent, you need to configure your e-mail server. Find out who your email provider is. Gmail and Microsoft email configuration for Ozols TMS
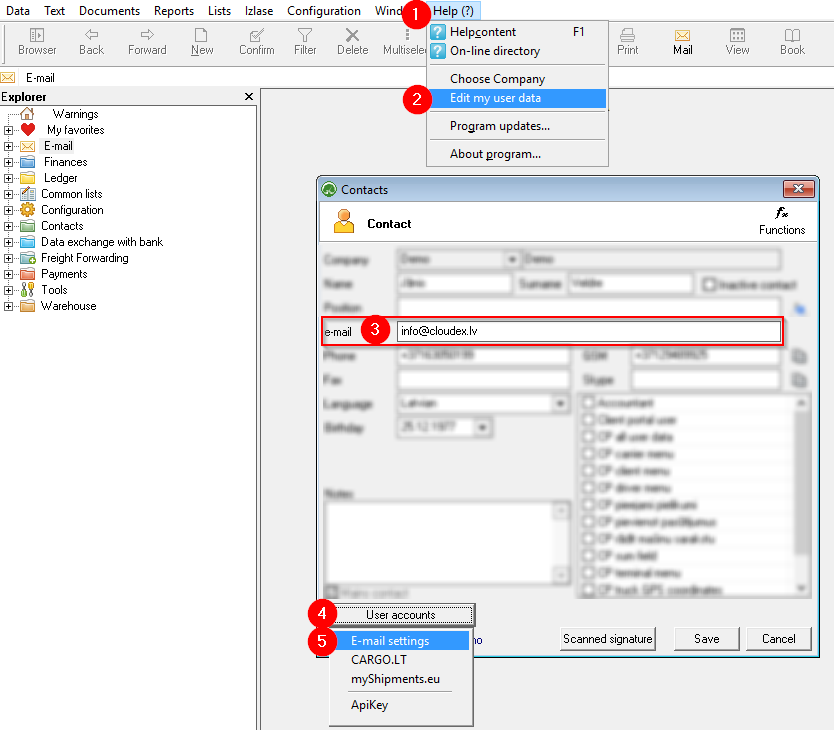
- Select in Menu Help
- Edit my user data
- If applicable, complete the user data. Make sure that the correct email address is provided!
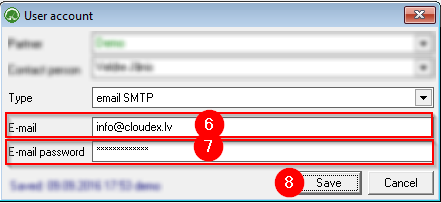
- Click User Accounts
- Select email SMTP

- Enter your business e-mail address
- Enter your business e-mail password
- Save changes

If you have questions regarding these instructions, please contact the OZOLS TMS Customer Support team: info@cloudex.lv
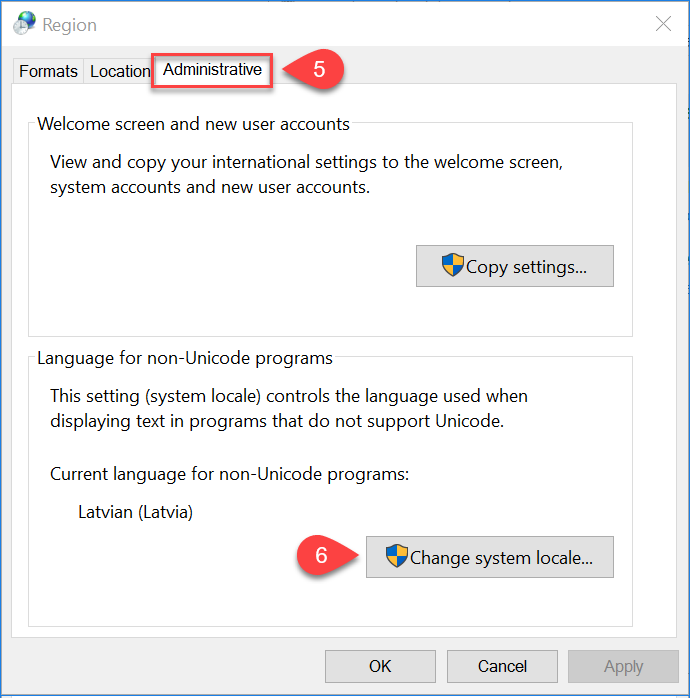
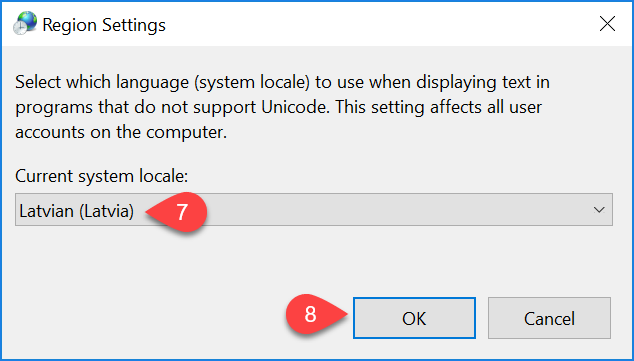
6) Incorrect letters in your local language?
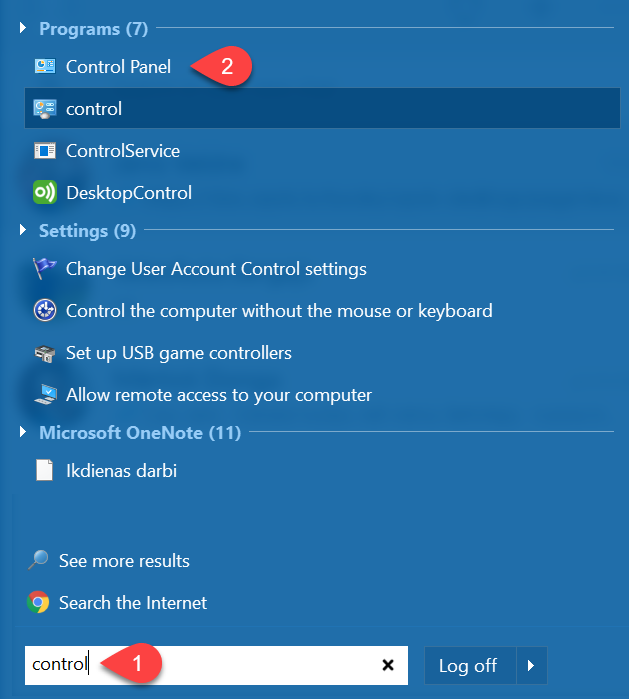
If your local language characters are not correctly displayed in the Ozols TMS, please do following steps in your computer:
- In Windows “Start menu” write "Control" or "Panel"
- Choose Control Panel


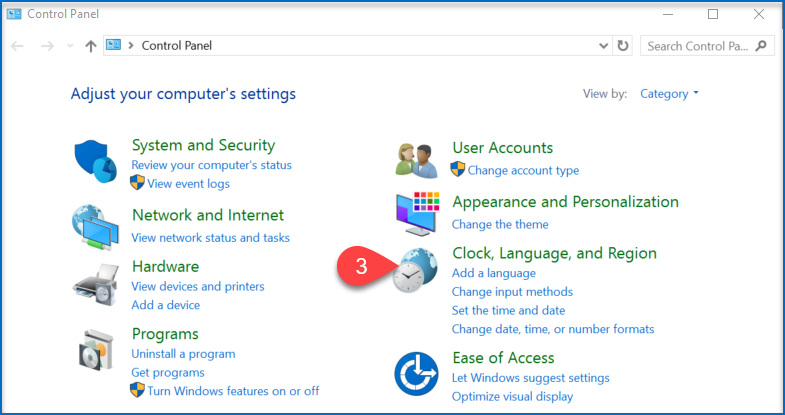
- Select Clock, Language, and Region
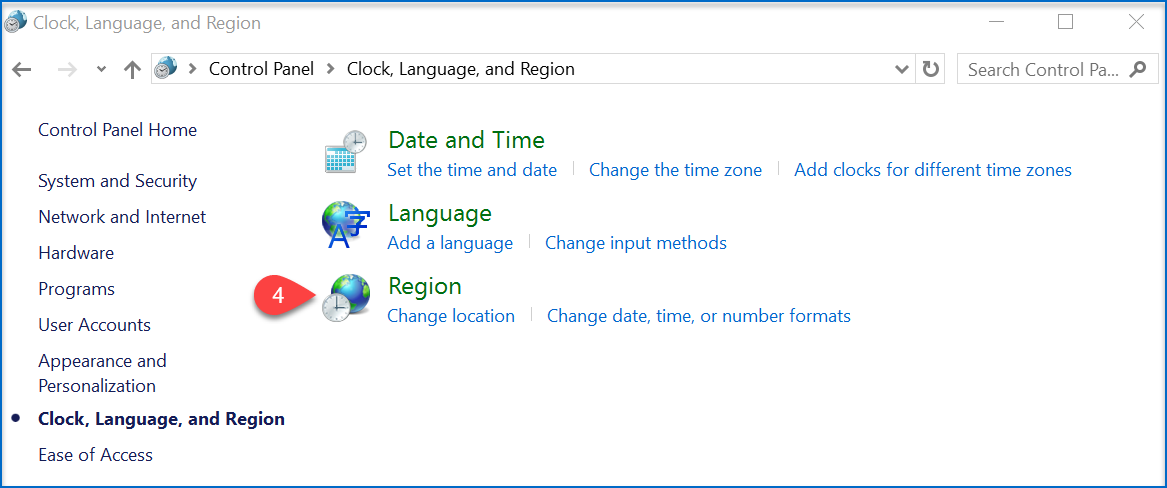
- Region


- Open Administrative
- Change system locale...

- Select your preferred language
- Save changes

If the above instructions have not solved the problem, please contact OZOLS TMS Customer Support at info@cloudex.lv or call +37 (283) 8 83 00
7) Unable to connect to OZOLS TMS
If by connecting to OZOLS TMS you encounter the message:
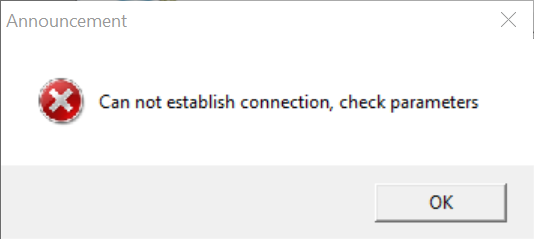
1. If the Notification waiting time is less than ~5 seconds:
Make sure you have entered the User Name and Password correctly.
2. If waiting time for Notification is more than ~5 seconds:
1. Press the "Options <<" button
2. Check if the server name and database name are entered correctly
3. Make sure the internet connection is working
If the above instructions have not solved the problem, please contact OZOLS TMS Customer Support at info@cloudex.lv or call +371 (283) 8 83 00
8) E-mail server configuration for work with Ozols TMS
1. To send Gmail emails from within OZOLS TMS, follow these steps:
1) Open a Google account and authorize:
2) Opens the Security section

3) Activate two-step authentication (a confirmation code will be sent to the phone)

4) Select App passwords

4) Choose Other (Custom name)

5) Type "Ozols" in the window and press GENERATE

5) A gmail password for the OZOLS TMS system is created

5) This password must be entered in the user's email settings in OZOLS TMS by following the instructions here.
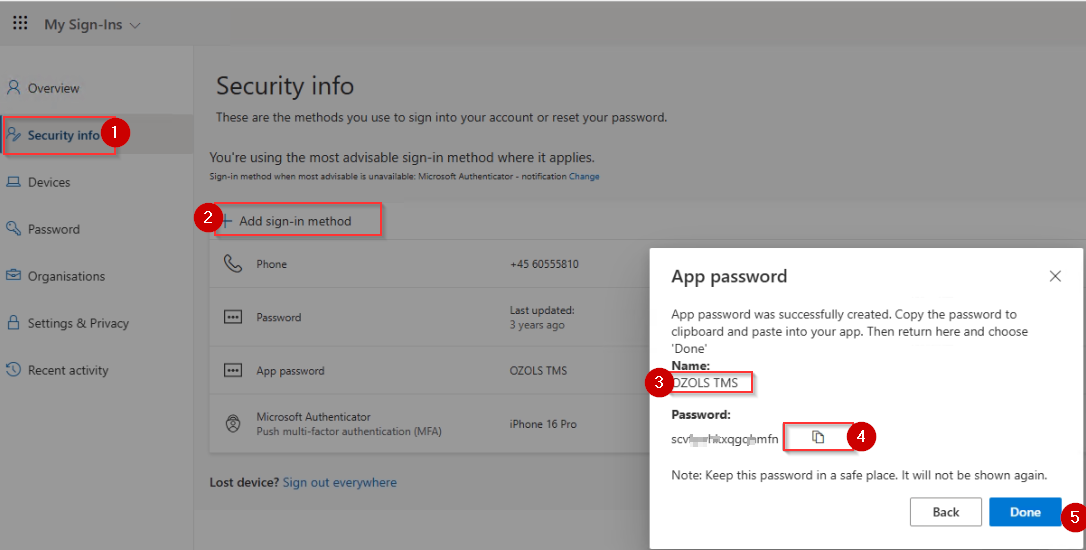
2. To send Microsoft e-mails from OZOLS TMS, you must perform the following steps:
- Open the following link and sign in to your Microsoft account:
https://mysignins.microsoft.com/security-info

-

- Select > Add method > App password

-
Copy the password created by Microsoft

- This password must be entered in the user's email settings in OZOLS TMS by following the instructions here.


If Windows Smart App Control blocking your app
✅ What you can do
Option 1 — Unblock manually (safer approach)
Try this first:
- Go to C:\Program Files (x86)\Ozols\ folder
- Right-click
OZOLS.EXE - Click Properties
- At bottom → check “Unblock”
- Click Apply → OK
- Run again
Option 2 — If you TRUST the app
If this is your own or known software:
- Click “Ok”
- Go to:
- Windows Security
- → App & browser control
- → Smart App Control settings
- Turn Smart App Control → Off
⚠️ Important:
Once turned off, you cannot turn it back on without reinstalling Windows (this is how Microsoft designed it).